Saturday 10 March 2018

I have moved

After some thought I have decided to rebrand my blog. You can now find me at

stitchedbysj.blogspot.co.nz

I would appreciate if you could update your blog reader with my new address.

Thanks
Sandra

Wednesday 31 January 2018

Perfecting the Skirt and Rainbows

Kia ora! In December last year, after purchasing and watching the new Susan Khalje class on Craftsy "The Couture Lace Skirt", I pulled my unfinished skirt block from the depths of the muslin pile and decided I needed finish it. 

To be honest, I don't wear a lot of skirts which is why I've never bothered to finish it, but I really really really want a guipure lace skirt. I didn't want to start with having to find a skirt pattern then go through the fuss of fitting it for my body. The toile felt more than a little snug around the hips so I added 1/2" to the side seams of the pattern, giving a 1" ease, then got out some remnant fabric and proceeded to sew up a skirt. Hmmmm, it didn't fit!  It was way too big and almost fell off my hips. Yeah, I know, I should have done a fitting once I got the side seams together, but it was December and the end of a long year!  Anyway, I made some tweaks to the pattern, dived into the stash again for more fabric and made another - okay it was a boring black skirt! But hey, I made sure the lining was fun. And who doesn't need a black skirt, right.


I made a couple more tweaks to the pattern before deciding it was time to test out Susan's techniques before fully committing to the guipure lace. Hello rainbow skirt 😎


The rainbow eyelet I purchased from The Fabric Store in January 2017 with a thought to making a bomber jacket ... I never did make it. I then found this very cute cotton lawn with a small floral print - I've got no idea where it came from or when I purchased it, so I'm guessing because it didn't have one of my fabric stash tags it's been in the stash for quite ... some ... time!


First I cut out the cotton, put all the necessary markings on the cotton with one of those Frixon erasable pens, coz I love them, then placed the cotton pieces on the eyelet fabric and thread traced them together and treated them as one. I sewed in the darts and tacked the two pieces together by hand with rows of horizontal running stitches about 2 inches apart.


I finished everything except for the waist. I found some white striped acetate in the stash and constructed the lining. All three layers are secured together at the waist and finished with a piece of grosgrain ribbon, as recommended by Susan. The zipper is inserted by hand using a pick stitch (which is my favourite way to put in a zipper if I haven't already told you that before).


I am in love with the small floral underneath the eyelet 💖


You can't even really tell where the darts are. Well you have to look super close 👀


I wore the skirt to work for the first time this week. I totally enjoyed the fit of the skirt, the shape and the length. I think I'm ready now to make many more variations using my bock, but first I need to tackle the guipure lace skirt using all the applique techniques Susan teaches.


Until next time, happy sewing 😘

Friday 19 January 2018

Couture Sewing School with Marfy 3507

Kia ora and happy New Year! As I sit on the plane returning home after eight intense days in Melbourne I thought I would share the amazing experience that is a couture masterclass with Susan Khalje.

I arrived to class on day one looking forward to not only meeting Susan but also to meet Melanie aka Poppykettle. It was so surreal meeting them both - isn't it funny how social media and the internet can make us feel like we already know someone without having met them in real life.

After settling into the sewing table next to Melanie we all gathered for some introductions. As it turns out most of the others in the class were returning for a second year of couture sewing under Susan's guidance, but we all very quickly got to know each other and spent the week in awe of each other's work.

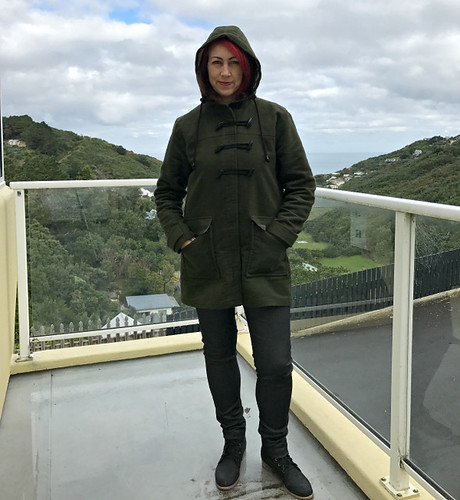
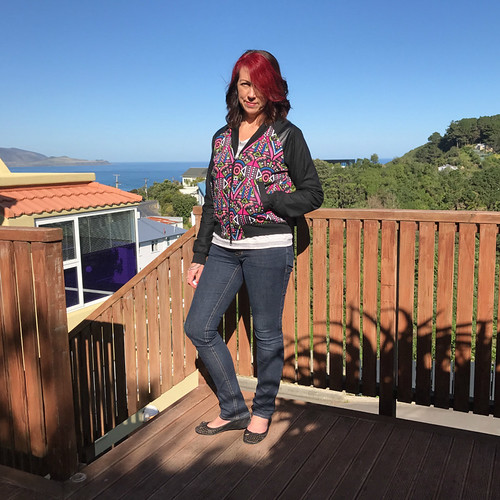
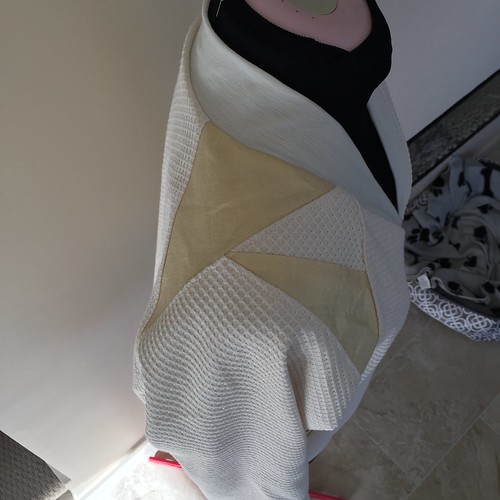
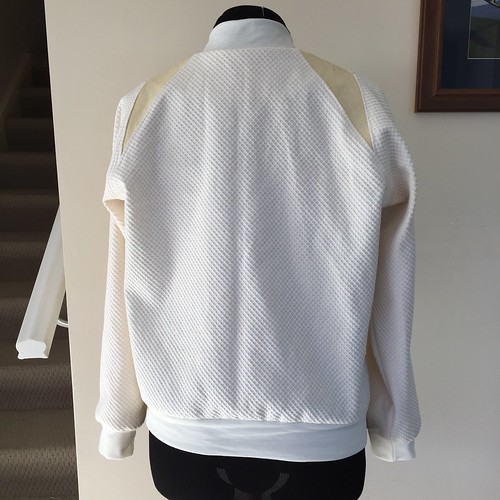
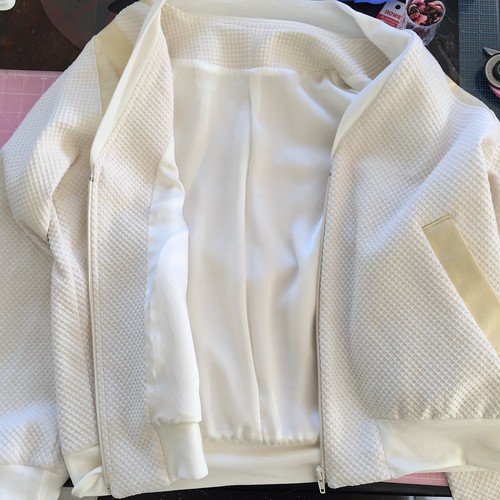
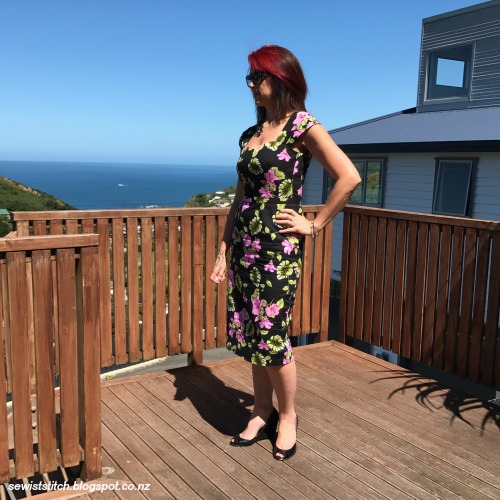
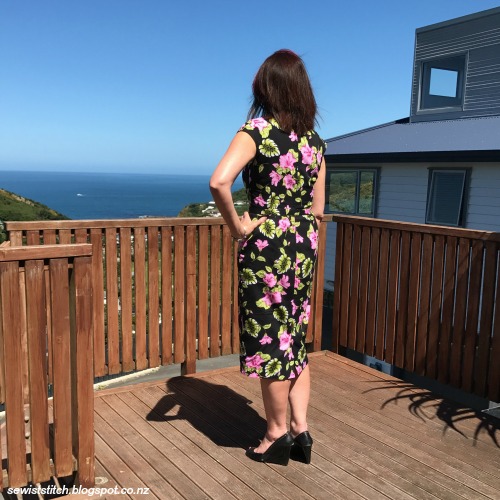
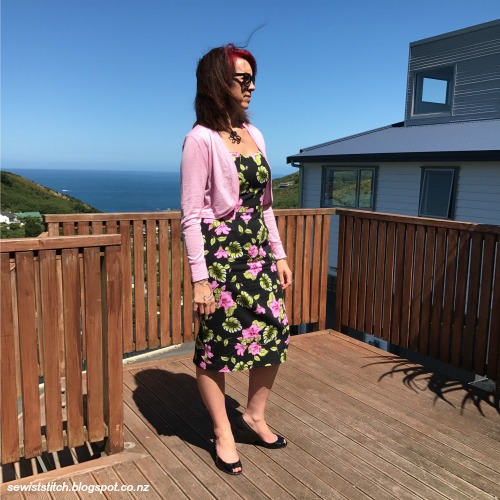
When I left home I was a little unsure what I was going to make to take full advantage of my time with Susan. Option number one was Marfy 3507, a coat-dress. I'm in love with the collar and zippers of this pattern.


The second option was a jacket with a lace insert panel at the back. Marfy 3791. Again the collar was the feature that caught my eye.


Before I left home I made a toile/muslin for both patterns and hoped that by the time I turned up to class I would have a definite preference. But it was the class who helped me make the decision in the end with the coat dress clearly the winner :-)

Day one was all about the toile/muslin. Watching Susan work her magic and do fittings for all the different body shapes with all the different garments was truly magical. Unfortunately I was so engrossed in the day that I didn't take one photo :-(  I've done a few fitting classes on Craftsy and read a few books but I still struggle with fitting, so for Susan to talk through what she was doing with each one - I learnt sooooo much.

After all the adjustments were marked up on the toile it was pulled apart and used as pattern pieces.

Day two was all about tracing the toile onto silk organza and wax tracing all the markings. Then taking all the silk organza pattern pieces and laying them onto the fashion fabric and thread tracing each piece. Day two was a productive day, feeling as though I had achieved quite a bit by the end of the day.


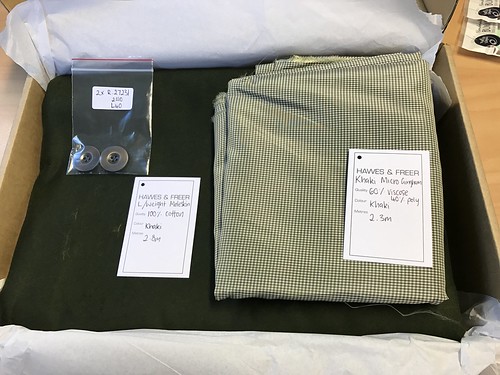
In June last year I treated myself and purchased two pieces of fabric from Mendel Goldberg in New York. When a place opened up in Susan's class I knew that I wanted to use the Mendel Goldberg fabric and luckily enough all the stars aligned and I had just enough fabric to make the coat-dress, because I definitely didn't buy it with this pattern in mind.

… and then there was day three *sigh*. It started off really well, I attached both side back pieces to the centre back, matching up all the lines perfectly *happy dance*.


But then for the next six hours I only managed to sew four seams, two for each side front attaching to the centre front pieces. Most of that time was spent counting stupid lines and trying to work out why the lines didn't go perfectly around the body, I was doing some very loud screaming in my head. So after some expert assistance from Susan I finally worked out that adjustment was needed in a couple of places. I was glad to see home time that day.

Day four and it was beginning to look like a dress and I could do my first fitting and make some initial style decisions. Thanks to Roz (the keeper of all things) the decision on the zipper was a no brainer. She had this black metal zipper with gorgeous rose gold teeth - I was instantly in love. So with that Roz took a few of us off to Jimmy Buttons, and well that is a whole separate story!


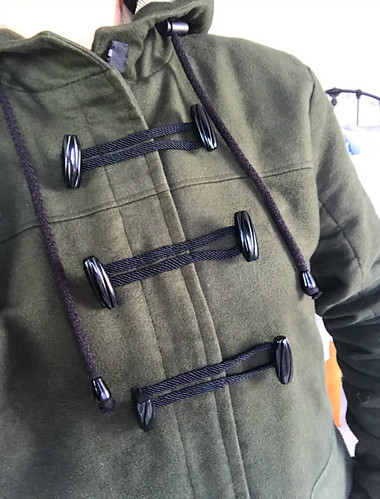
As you can see from the pattern there are pocket flaps, but with this lofty fabric I decided that the flaps sitting above the box pleat would just be too much bulk so we opted for a couple of buttons instead. Thanks to Susan who found the perfect option in among the ciaos at 
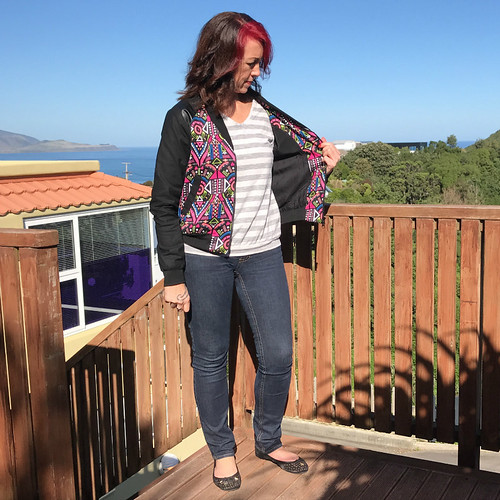
Jimmy Buttons. The zipper went in by hand, stripe matching all the way. However my stripe matching wasn't that great first time round so I had to unpick one side and do it again. This time I closed the zipper in small sections so I could match the other side as I went.

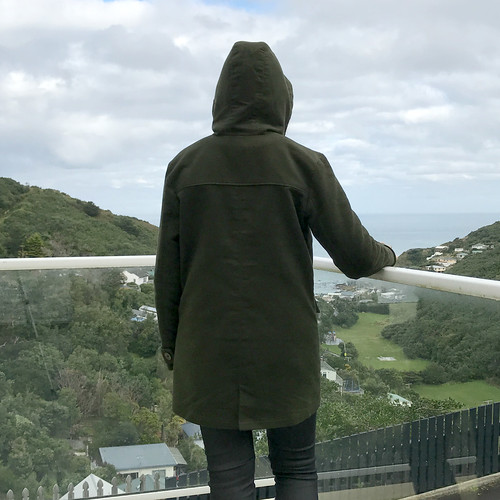
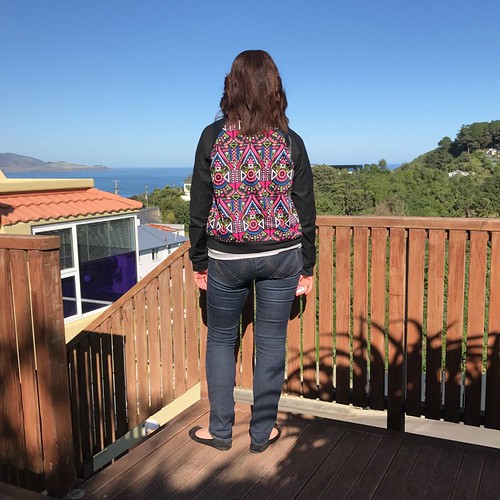
Day five - it was time to put together the front facing and upper collar. I needed to draft a back facing so everything would sit better and I could hide all the collar joins. I machine stitched from the start of the collar roll (top of the zipper) all the way around the collar to the other side. Once again paying attention to those dang stripes! Can you see the corner seam where the collar attaches to the dress?

Just before the end of the day I was able to have the sleeves fitted, alterations marked, silk organza marked and fabric cut.


Day six was all about fitting those sleeves. Susan very kindly fitting one sleeve then sent me away to fit the other one. While I got all the stripes lined up Susan still had to undo the stitches and adjust the amount of fabric in and out of the seam so it was a much smoother fit. Hopefully I've taken that all in and can replicate that next time. She makes it look so easy.

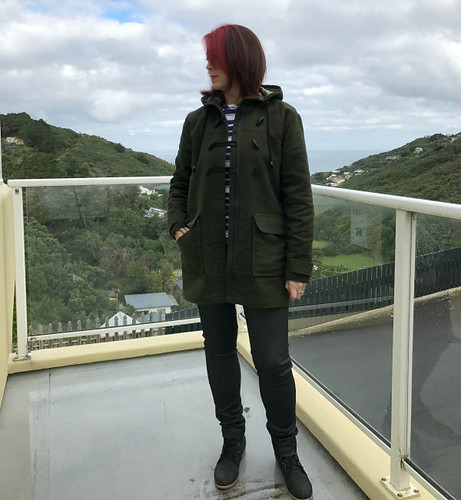
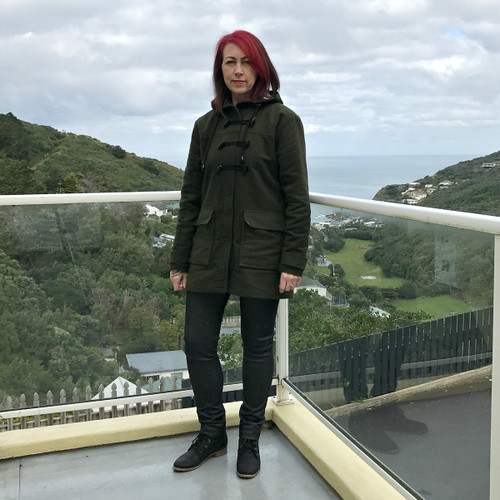
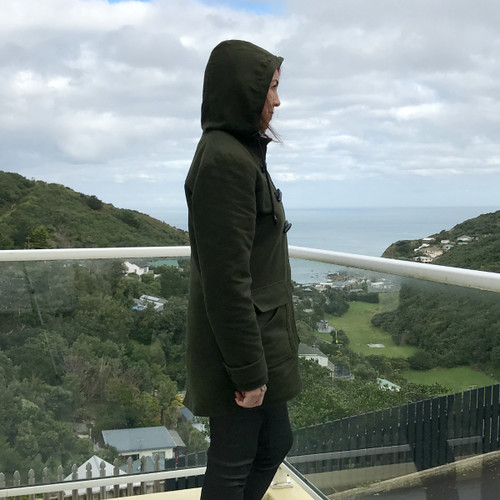
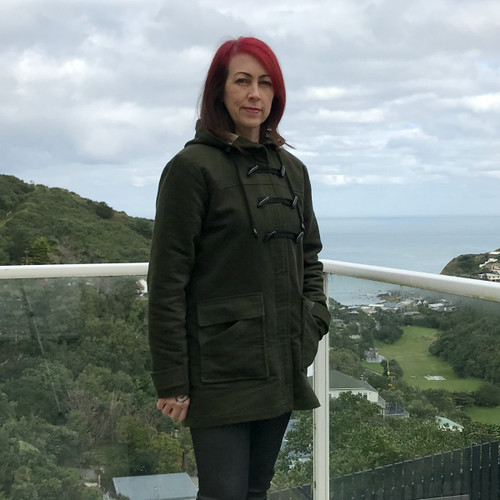
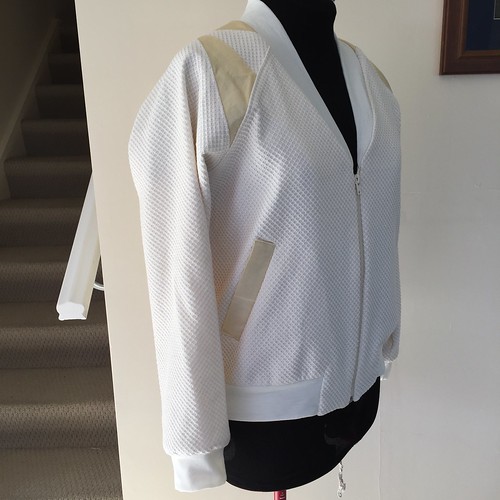
I'm still coming to grips with the fact that I had six days of nothing but sewing and I didn't finish, but that is couture sewing. I return home to stitch in the sleeve zippers, under-stitch the facing on the inside of the front zipper, tidy up armholes, hem and put in the lining. Here is a sneak peek of the progress to date.


Head on over to Susan's Instagram to check out what others in the class made. I'll do an updated post once I've finished and got some decent photos.

Happy sewing everyone :-)

Saturday 30 December 2017

2017 is a wrap!

What do you know ... here we are at the end of 2017! Believe it or not I have done some sewing despite the ol' blog being a bit bare. Although I do think Instagram has played a big part as well - I can share in progress photos pretty quickly without having to worry about getting good photos, which is the part I really struggle with, and it's not so much capturing the photos it's more the time to take photos then edit them. Anyway, more about what I have had on my sewing table this year ...

This has been the year that I've pretty much sewn two of everything!
  • two Jamie Christina Hi Lo Raglan hoodies
  • sewed my second Muse Patterns Gillian wrap dress
  • two Sapporo coats by Papercut patterns
  • two Style Arc Livia jackets
  • two skirts using my skirt block
  • sewed my second Olivia oversized tee by Maria Denmark
  • three Sewaholic Belcarra tops
  • three Julia Women's cardigans by MHC
  • sewed my third Saiph by Papercut Patterns
Rather than chat further let's looks at some photos of this year's entries into the wardrobe.


And that's a wrap for 2017. The aim for the new year ... get better on the blog!

Wishing you all the best for 2018 

Friday 26 May 2017

Moleskin Duffle for Winter 2017

Kia ora! This is kinda exciting ... well I'm excited anyway. I was flattered when I was contacted by Hawes and Freer to see if I was interested in participating in the launch of their new website. Now, little did they know that I often stalked their website drooling over the beautiful wool coating and while I wanted to say yes, I really had to think carefully about whether I could commit the time.

As you can see I said yes!

Photo moleskin2

I was planning to make another Albion Duffle coat this winter, so this was the perfect opportunity when I was shown the beautiful range of lightweight moleskin available from Hawes and Freer. What colour to choose???? After changing my mind over and over I settle on the olive green, with a army gingham for the lining. It all arrived beautifully packed and labeled.


Photo moleskin17

I had previous made the Albion Duffle for my son, who only wore it a handful of times before he grew out of it! I couldn't bare the thought of all that work just sitting on the hanger, so for the last couple of years I've been wearing it as my main winter coat and have loved it, despite the shoulders being too big.

This time I traced off a size small with a couple of slight alterations
  • I inserted a centre back seam and created a slit in the back to create a bit more freedom when I sat in the car. I also shaped it slightly so it curved in at the waist - ever so subtle.
  • Same with the side seams I created a slight curve in at the waist, nothing dramatic so you probably don't even notice it.
  • I added another pocket over top of the patch pocket which is more for putting my hands in than putting stuff in!
  • I played with the hood a little as well, but I tell you about that soon.
Photo moleskin8

Other than the hood I constructed the coat according to the instructions.

I knew I wanted to have a zipper in this version, but my brain couldn't work out how I insert the zip with the machine during the construction, ahhhhh! So I opted to just sew the zipper in by hand. Actually I sewed it in twice ... initially I bought and inserted a bottle green zipper but after I had put it in I decided it didn't look right so ripped it out and bought a black zipper instead.

Photo moleskin3

Now the hood ... I really like it when I have something that comes up and covers my neck, it makes me feel warmer and protected from the wind. This was all a bit of trial and error, but I drafted the hood to extend to the edge of each front piece and extended up, best just look at this photo rather than me explain any more.

Photo moleskin13

It's not perfect but I'm pretty happy with how it turned out and gives me just the little bit more protection from the wind that I wanted. Talking about wind, this moleskin is amazing, it's perfect for keeping the wind out! Believe me that is a must when you live in Wellington.

Photo moleskin1

To finish the coat and give it a bit of decoration I created three button thingys across the chest. I bought some cord (the proper name escapes me right now) and created loops by hand sewing them to the right front.  The buttons on the right are just decoration but the buttons on the left are functional. I'm pretty happy with how they balance out the pockets.

Oh and one last thing - I created a slight high-low hem, again ever so subtle.

Photo moleskin9

I've worn this every week since I finished it at the end of April. Winter has set in here and going outside without a coat is no longer an option. I think its going to be a long cold winter this year.

Photo moleskin10

To conclude, the moleskin was an absolutely dream to sew and the gingham lining was the perfect match. Hawes and Freer provided me with the moleskin the gingham lining and the two cuff buttons in return for a blog post to coincide with the launch of their new website. I have the freedom to express my own thoughts and opinions, but honestly I can't talk highly enough about the quality of the fabric I received.

Initially I was a little disappointed that there wasn't more of a fabric selection on their new website but Hawes and Freer have assured me that there will be more fabric being loaded to the website, so people like me that can't get to their bricks and mortar shop will have more of a selection. I'm looking forward to that.

More photos on my Flickr -->

Sunday 23 April 2017

When one bomber is just not enough!

Kia ora! I know it's April but I want to take you back six months to October last year. The weather was beginning to get warmer, daylight savings was about to start and I felt that I needed more casual clothes in my wardrobe.  Or was it I was just looking for a quick fix, instant gratification kinda project?!? This is when I decided that I needed another bomber jacket in my life.

Aztec Rigel Bomber

I had previously made the Rigel Bomber by Papercut Patterns but at that time I forgot to check the sleeve length, and every time I wear it, it annoys the sh*t out of me. This time I made exactly the same size as my previous jacket, adding 3" to the sleeve length. I made just one other adjustment this time, removing 1/2" from the centre back of the collar piece.


I also wanted to try this pattern using the insets at the top of the raglan sleeve, for that extra effect.  I had purchased this aztec cotton lycra online a little while ago and when it arrived I was really surprised at how bright it was - I probably would never have bought it if I had been shopping in a bricks and mortar shop. At the time I had no idea what on earth I would ever use it for, but it turned out perfect for this jacket. I also some faux leather in the stash that I'd bought for something else and used that for the sleeve insets.

Aztec Rigel Bomber

This version is fully lined with silk crepe de chine.

Aztec Rigel Bomber

When my daughter found out what I was making, she also decided she wanted one - a cream one of all colours!  I was in the zone, it was her birthday, so I didn't put up any objections to making another. Although I was getting rather jealous while making her one, that it was so much better than mine. I selected this honey comb cotton fabric with a gold foil, both from The Fabric Store.

Rigel bomber jacket 2016

The gold foil was very light weight so I had to interface all of the pieces to get it to a similar weight as the main fabric, well stable enough to hold its own.

Rigel bomber jacket 2016

For the ribbing, I settled for a merino knit to get the colour match as close as possible. I just have one regret - that I didn't double the layers in the collar. For the sleeve cuffs and the hem band, I cut two so when it's folded on itself it is four layers thick. It works perfectly with really good recovery. The collar on the other hand feels a bit flimsy.

Rigel bomber jacket 2016

I fully liked this version as well, this time with a cream satin - it feels amazing to wear. Unfortunately this is one size too big for me and the sleeves are short, so wearing it isn't that great. Darn!!!

Rigel bomber jacket 2016


It is so luxurious! It was definitely not cheap - I added up all the fabric and lining and it came out at $110.00!  So you can image my reaction when I see it lying on the floor of her room....

Anyway, I had total fun making both these jackets. I wouldn't hesitate to put more of them in my wardrobe. Although next time I might try raising the collar and go for the traditional round neck rather than this V-neck version.

More photos on my Flickr --->


Friday 17 March 2017

Pink Floral Sweetheart

Pink Floral Dress

This dress was fun but challenging at the same time. First the fun ... I found this fabric by accident while on holiday in Rarotonga earlier this year, and immediately knew it would make a lovely summer dress while still keeping within my wardrobe comfort zone ... because it was black? probably!

The challenge ... to mash together two separate patterns into one dress that looked like it was meant to be. The top is the Sewaholic Cambie pattern and the bottom is the Billy Jean pattern by Bluegingerdoll.  Both dresses I've made before quite a while ago, and well, the body has changed a little since then.


Then came the cheating ... in theory, the side seams and dart legs of the top are meant to be in the same vertical line as the skirt, right?! Hmm, did I really need to fluff with getting that right if the skirt and top are separated by a waist band and the floral print would act as a camouflage ... NO! Can you tell? NO!  #winning

Pink Floral Dress

Pink Floral Dress

With this dress I experimented a bit with the underlining. I took my silk organsa and underlined all the front pieces and the top half of all the skirt pieces.

A couple of reasons really.  I didn't want the dress to be too heavy but I did want the front to have some structure. The top half of the skirt needed to fall over my hips without showing every curve but the bottom half really didn't need it. Unfortunately I can't find any of my 'work in progress' photos to share with you :(

The dress is also fully lined, but with separate fabrics for the top and bottom.  The top half is lined with some silk crepe de chine from The Fabric Store. Something I bought a wee while ago at a good price because of colour inconsistency. No one gets to see the lining, so not a problem. The skirt is lined with some 'new to me' lining from Hawes and Freer Ltd, from their Superwash range. It is heavier than the crepe de chine which helps give another layer of fabric over the hips and butt and helps the skirt fall really nicely. It skims over the body and moves so nicely, but doesn't look bulky, and so far no static! I think I'm sold on this as a lining for skirts!

To finish the look I picked up some baby pink merino from Levana and whiped up this cute little bolero.

Pink Floral Dress


More photos in my Flickr album -->